Create a Domain on Windows Server 2019
Create a Domain on Windows Server 2019
This guide explains how to create a domain on Windows Server 2019. We will install the “Active Directory Domain Services” (AD DS) role, which stores information about users, computers, and other devices on the network. AD DS helps administrators securely manage this information and facilitates collaboration among users in the same domain.
Installation
In “Server Manager,” click on “Manage” and then “Add Roles and Features.”
Next
Select “Role-based or feature-based installation.”
Choose your server, then click Next.
Select “Active Directory Domain Services” and click “Add Features,” then click Next.
We will not add any additional features, so click Next.
Next
Click Install.
Installation… Once complete, click “Close.”
In Server Manager, click on “AD DS.” A message will appear indicating configuration is required. Click “More…”
Click “Promote this server to a domain…”
In this case, I don’t have a forest or domain, so I will create a new forest with my root domain “POC.local.” You can name it whatever you prefer; I chose POC for Proof Of Concept.
Here, leave the functional level at 2016. Also, keep the DNS Role checked. Set a DSRM password.
We don’t need DNS delegation for now, so skip this step and click Next.
Set the NetBIOS name (I will leave it as is) and click Next.
We will use the default paths, so click Next.
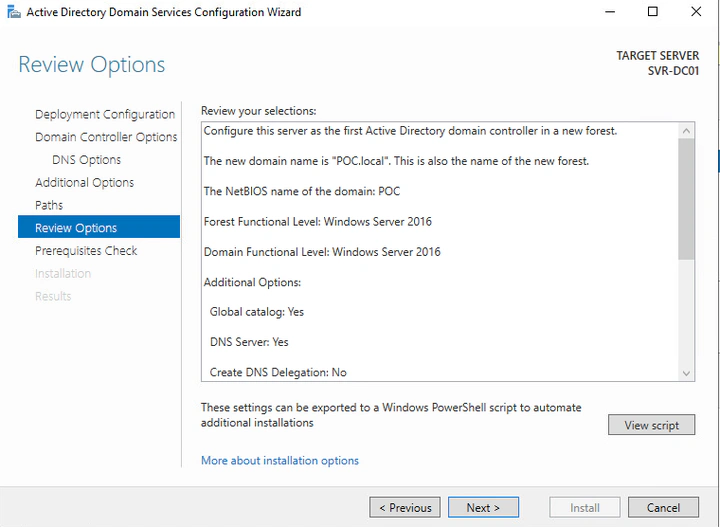
Next
Now it will perform a prerequisite check. If everything is good, you can proceed with the installation.
Installation…
After the installation, the server will reboot.
Congratulations, the installation is now complete! Log in with the Admin account, which is now the domain admin account.
Enjoy! 😎