Reinstall WSUS and the Software Update Point Role in ConfigMgr

Reinstall WSUS and the Software Update Point Role in ConfigMgr
I recently encountered synchronization errors with the Software Update Point in SCCM/MECM. The SUP role in ConfigMgr manages the WSUS server role. I attempted a WSUS reset, but it ended up causing more issues. To fix this, I decided to start fresh by uninstalling and reinstalling everything.
Here’s a short version followed by a longer version with additional details.
The Short Version
To get everything back on track, follow these step-by-step instructions:
- Open the ConfigMgr console and uninstall the SUP (Software Update Point) role in ConfigMgr.
- Open Server Manager and uninstall the WSUS role from the server.
- Reboot the server.
- You can either delete/restore the SUSDB database on your SQL server or keep it. In my case, I had a functional backup from before the issues, so I chose to restore the database and overwrite everything.
- Open Server Manager and install the WSUS role on the server. Since I use an MS SQL server, I chose the “SQL Server Connectivity” option instead of WID. Specify the SQL Server instance and proceed with the installation.
- From the WSUS installation success window, click “Launch Post-Installation Tasks.” WSUS will detect if a SUSDB database exists. If not, it will create one; if it exists, it will use it. In my case, it detected my restored database and used it.
- Reboot the server.
- Open the ConfigMgr console and install the SUP (Software Update Point) role in ConfigMgr.
- From ConfigMgr, initiate a sync without products (empty sync) to ensure everything is functioning correctly. (Check the
wsyncmgr.logfile.) - Configure your SUP role (select products and classifications).
- Initiate a sync and verify that everything works properly (check the
wsyncmgr.logfile).
And that’s it! You’ve reinstalled WSUS and the SUP role in ConfigMgr.
If you encounter a mismatch issue with the catalog version between ConfigMgr and WSUS, here’s a fix: https://rzander.azurewebsites.net/query-to-get-mincatalogversion-from-sccm-updates/
Hope this helps! It’s working perfectly for me now. 😎
The Long Version
This version includes the same steps as above, but with additional screenshots and details.
1) Uninstall the Software Update Point Role from ConfigMgr
Open the SCCM/MECM console and navigate to Administration > Overview > Site Configuration > Servers and Site System Roles.
Click on the relevant site, right-click on “Software Update Point,” and select “Remove Role.”
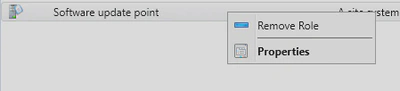
Follow the step-by-step instructions to uninstall the role.
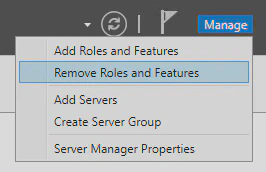
2) Uninstall the WSUS Role from the Server
Open Server Manager, click “Manage,” and then “Remove Roles and Features.”
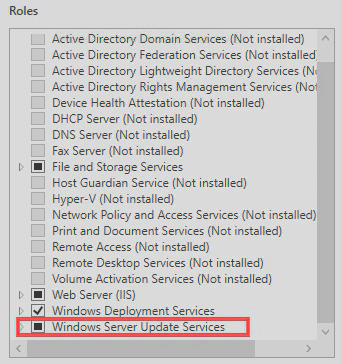
Uncheck the “Windows Server Update Services” option to uninstall WSUS.
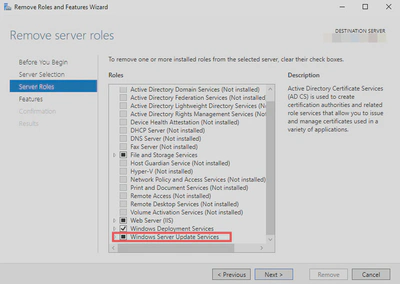
Click Next and follow the step-by-step instructions.
3) Reboot the Server
4) Delete/Restore the SUSDB Database
You have two options: delete the SUSDB database or restore it from a backup. In my case, I had a functional backup from before the issues, so I restored the database and overwrote everything.
5) Install the WSUS Role on the Server
Open Server Manager and install the WSUS role on the server. Since I use an MS SQL server, I chose the “SQL Server Connectivity” option instead of WID. Specify your SQL Server instance and proceed with the installation.
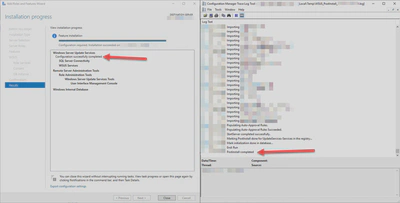
6) Launch Post-Installation Tasks
From the WSUS installation success window, click “Launch Post-Installation Tasks.” WSUS will detect if a SUSDB database exists. If not, it will create one; if it exists, it will use it. In my case, it detected my restored database and used it.
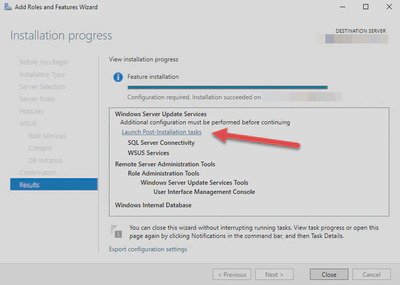
A Post-Install log is available in the current user’s temp folder:
C:\Users\CurrentUserThatMadeTheInstall\local\Temp\WSUS_PostInstall_XXXXXXXXXX.log
7) Reboot the Server
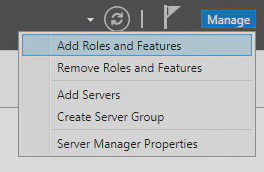
8) Install the SUP Role in ConfigMgr
Open the SCCM/MECM console and navigate to Administration > Overview > Site Configuration > Servers and Site System Roles.
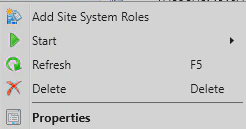
Right-click on the relevant site and select “Add Site System Roles.”
Complete the setup by selecting the “Software Update Point” role and ensure no products are selected. We will perform an empty sync first. Click on the products to select all, then deselect them to ensure none are selected.
9) Perform an Initial Empty Sync
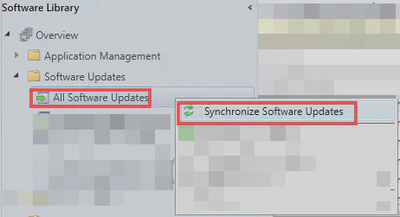
Go to Software Library > Overview > Software Updates > All Software Updates.
Right-click on “All Software Updates” and select “Synchronize Software Updates.”
Monitor the sync process in the wsyncmgr.log file.
10) Configure the SUP Role (Select Products and Classifications)
Open the SCCM/MECM console and navigate to Administration > Overview > Site Configuration > Servers and Site System Roles.
Click on the relevant site, right-click on “Software Update Point,” and select “Properties.”
Here, you can select your classifications and products.
11) Perform a Full Sync and Verify
Go to Software Library > Overview > Software Updates > All Software Updates.
Right-click on “All Software Updates” and select “Synchronize Software Updates.”
Monitor the sync process in the wsyncmgr.log file.
And that’s it! You’ve reinstalled WSUS and the SUP role in ConfigMgr.
Hope this helps! It’s working perfectly for me now. 😎